

Greek Yogurt Ice Cream is a delightful treat that combines the creamy richness of traditional ice cream with the health benefits of Greek yogurt. As someone who has always been passionate about creating delicious yet nutritious desserts, I can confidently say that this recipe is a game-changer. Originating from the Mediterranean, Greek yogurt has been a staple in many cultures for centuries, celebrated not only for its unique tangy flavor but also for its high protein content and probiotics.
People love Greek Yogurt Ice Cream for its velvety texture and refreshing taste, making it a perfect indulgence on a hot summer day or a guilt-free dessert any time of the year. The best part? Its incredibly easy to make at home, allowing you to customize flavors and sweetness to your liking. Whether youre a health-conscious eater or simply someone who enjoys a delicious frozen treat, Greek Yogurt Ice Cream is sure to satisfy your cravings while keeping things light and wholesome. Join me as we dive into this delightful recipe that will surely become a favorite in your household!

Ingredients:
- 2 cups plain Greek yogurt (full-fat for creaminess)
- 1 cup heavy cream
- 3/4 cup granulated sugar
- 1 teaspoon pure vanilla extract
- 1/4 teaspoon salt
- Optional mix-ins: fresh fruit, chocolate chips, nuts, or honey
Preparing the Base
1. **Gather Your Ingredients**: Start by measuring out all your ingredients. This will make the process smoother and more enjoyable. I like to have everything ready to go before I start mixing. 2. **Mix the Yogurt and Cream**: In a large mixing bowl, combine the 2 cups of Greek yogurt and 1 cup of heavy cream. Using a whisk, mix them together until they are well blended. The heavy cream adds a rich texture to the ice cream, while the Greek yogurt provides a tangy flavor. 3. **Add Sugar and Vanilla**: Next, add 3/4 cup of granulated sugar, 1 teaspoon of pure vanilla extract, and 1/4 teaspoon of salt to the yogurt and cream mixture. The sugar will sweeten the ice cream, while the vanilla enhances the flavor. Whisk everything together until the sugar is fully dissolved. This step is crucial because it ensures that your ice cream will be smooth and not grainy. 4. **Taste Test**: Heres a fun part! Take a small spoonful of the mixture and taste it. If you prefer it sweeter, feel free to add a little more sugar. Remember, the sweetness will mellow out a bit once its frozen, so dont be afraid to adjust to your liking.Chilling the Mixture
5. **Chill the Base**: Cover the bowl with plastic wrap or a lid and place it in the refrigerator for at least 2 hours. Chilling the mixture helps to develop the flavors and ensures that its cold enough to churn properly in the ice cream maker.Churning the Ice Cream
6. **Prepare Your Ice Cream Maker**: If you have an ice cream maker, make sure its ready to go. If your machine requires pre-freezing the bowl, make sure it has been in the freezer for at least 24 hours prior to churning. 7. **Churn the Mixture**: Once the base is chilled, pour it into the ice cream maker. Follow the manufacturers instructions for churning. Typically, this process takes about 20-30 minutes. Youll know its ready when the mixture has thickened and has a soft-serve consistency. 8. **Add Mix-Ins**: If you want to add any mix-ins like fresh fruit, chocolate chips, or nuts, do this in the last few minutes of churning. Just add them gradually and let the machine mix them in evenly. I love adding chopped strawberries or dark chocolate chips for a delicious twist!Freezing the Ice Cream
9. **Transfer to a Container**: Once the ice cream is churned, transfer it to an airtight container. Use a spatula to smooth the top and make sure there are no air pockets. This will help prevent ice crystals from forming. 10. **Freeze Until Firm**: Cover the container with a lid or plastic wrap and place it in the freezer. Let it freeze for at least 4 hours, or until its firm enough to scoop. If you can wait overnight, thats even better!Serving the Ice Cream
11. **Scoop and Serve**: When youre ready to enjoy your homemade Greek yogurt ice cream, take it out of the freezer and let it sit at room temperature for about 5-10 minutes. This will make it easier to scoop. Use an ice cream scoop or a large spoon to serve it into bowls or cones. 12. **Garnish and Enjoy**: You can garnish your ice cream with additional toppings like fresh fruit, a drizzle of honey, or a sprinkle of nuts. The possibilities are endless! I love to serve mine with a few slices of fresh banana and a drizzle of chocolate syrup.Storing Leftovers
13. **Store Properly**: If you have any leftovers (which is rare in my house!), make sure to store them in an airtight container. Its best to consume the ice cream within a week or two for optimal flavor and texture. If it gets too hard, let it sit out for a few minutes before scooping. 14. **Experiment with Flavors**: One of the best things about making your own ice cream is that you can experiment with different flavors.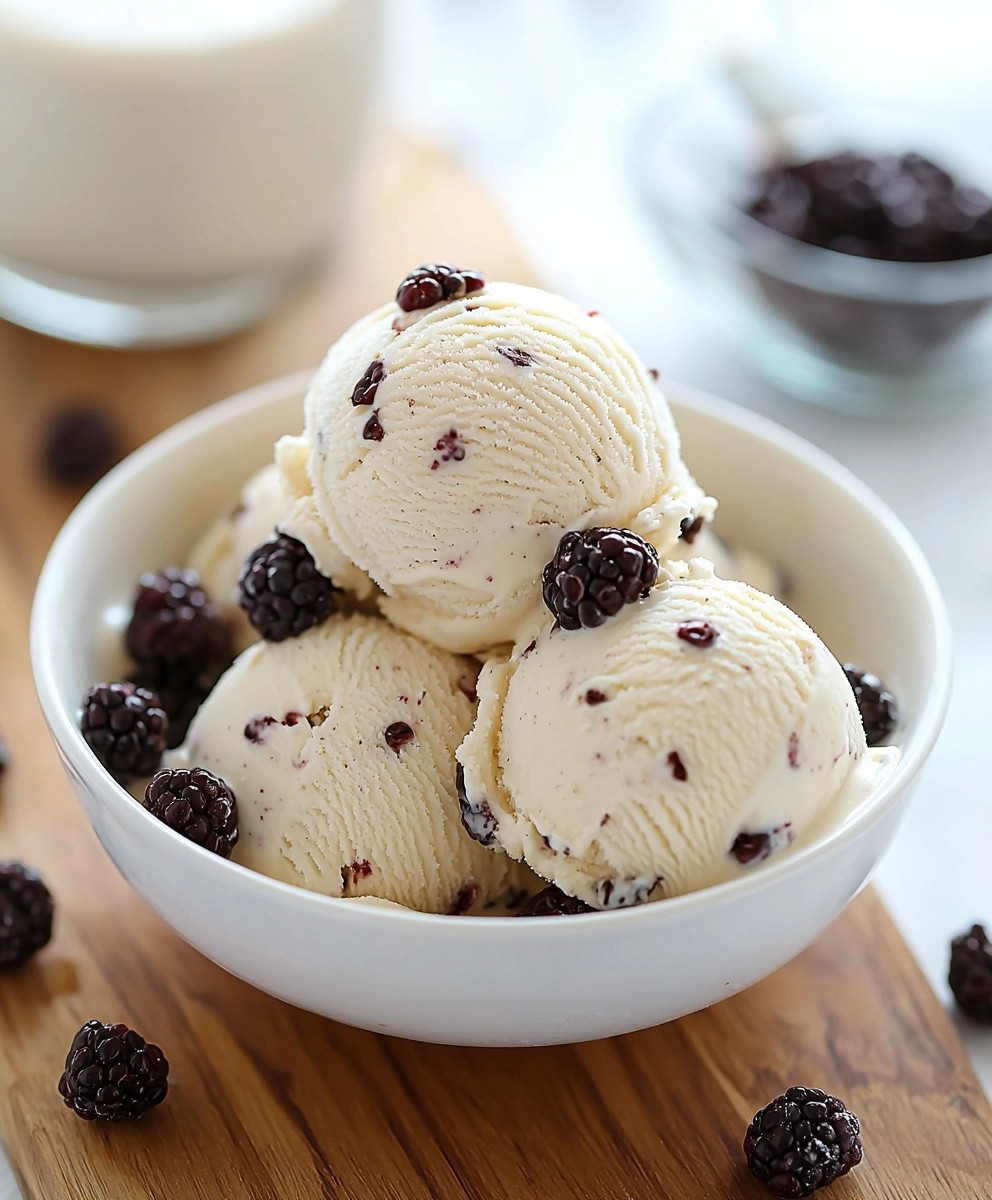
Conclusion:
In summary, this Greek Yogurt Ice Cream recipe is an absolute must-try for anyone looking to indulge in a deliciously creamy and guilt-free dessert. The combination of tangy Greek yogurt and sweet flavors creates a delightful treat that not only satisfies your sweet tooth but also offers a healthier alternative to traditional ice cream. Plus, its incredibly easy to make, requiring minimal ingredients and effort, making it perfect for both novice and experienced home cooks alike. For serving suggestions, consider topping your Greek Yogurt Ice Cream with fresh fruits like berries or sliced bananas for a burst of flavor and added nutrition. You can also drizzle some honey or maple syrup on top for an extra touch of sweetness. If youre feeling adventurous, try mixing in some crushed nuts, chocolate chips, or even a swirl of your favorite fruit puree to create your own unique flavor variations. The possibilities are endless! I wholeheartedly encourage you to give this Greek Yogurt Ice Cream recipe a try. I promise you wont be disappointed! Once youve made it, Id love to hear about your experience. Share your thoughts, any variations you tried, or even a photo of your creation. Lets spread the joy of this delightful dessert together! Print
Greek Yogurt Ice Cream: A Healthy and Delicious Dessert Option
- Total Time: 165 minutes
- Yield: 4–6 servings 1x
Description
Enjoy a creamy and tangy homemade Greek yogurt ice cream that’s both delicious and customizable. This healthier treat combines rich heavy cream with Greek yogurt, perfect for adding your favorite mix-ins like fresh fruit or chocolate chips. Indulge without the guilt!
Ingredients
- 2 cups plain Greek yogurt (full-fat for creaminess)
- 1 cup heavy cream
- 3/4 cup granulated sugar
- 1 teaspoon pure vanilla extract
- 1/4 teaspoon salt
- Optional mix-ins: fresh fruit, chocolate chips, nuts, or honey
Instructions
- Gather Your Ingredients: Measure out all your ingredients to streamline the process.
- Mix the Yogurt and Cream: In a large mixing bowl, combine Greek yogurt and heavy cream. Whisk until well blended.
- Add Sugar and Vanilla: Add granulated sugar, vanilla extract, and salt. Whisk until the sugar is fully dissolved.
- Taste Test: Taste the mixture and adjust sweetness if necessary.
- Chill the Base: Cover the bowl and refrigerate for at least 2 hours to develop flavors.
- Prepare Your Ice Cream Maker: Ensure your ice cream maker is ready, and the bowl is pre-frozen if required.
- Churn the Mixture: Pour the chilled mixture into the ice cream maker and churn according to the manufacturer’s instructions (about 20-30 minutes).
- Add Mix-Ins: In the last few minutes of churning, add any desired mix-ins.
- Transfer to a Container: Move the churned ice cream to an airtight container and smooth the top.
- Freeze Until Firm: Cover and freeze for at least 4 hours, or overnight for best results.
- Scoop and Serve: Let the ice cream sit at room temperature for 5-10 minutes before scooping.
- Garnish and Enjoy: Serve with additional toppings like fresh fruit or a drizzle of honey.
- Store Properly: Store leftovers in an airtight container and consume within a week or two.
Notes
- For a sweeter ice cream, adjust the sugar to your taste during the mixing stage.
- Experiment with different mix-ins to create your favorite flavor combinations.
- If the ice cream becomes too hard, let it sit out for a few minutes before scooping.
- Prep Time: 15 minutes
- Cook Time: 20-30 minutes


Leave a Comment