

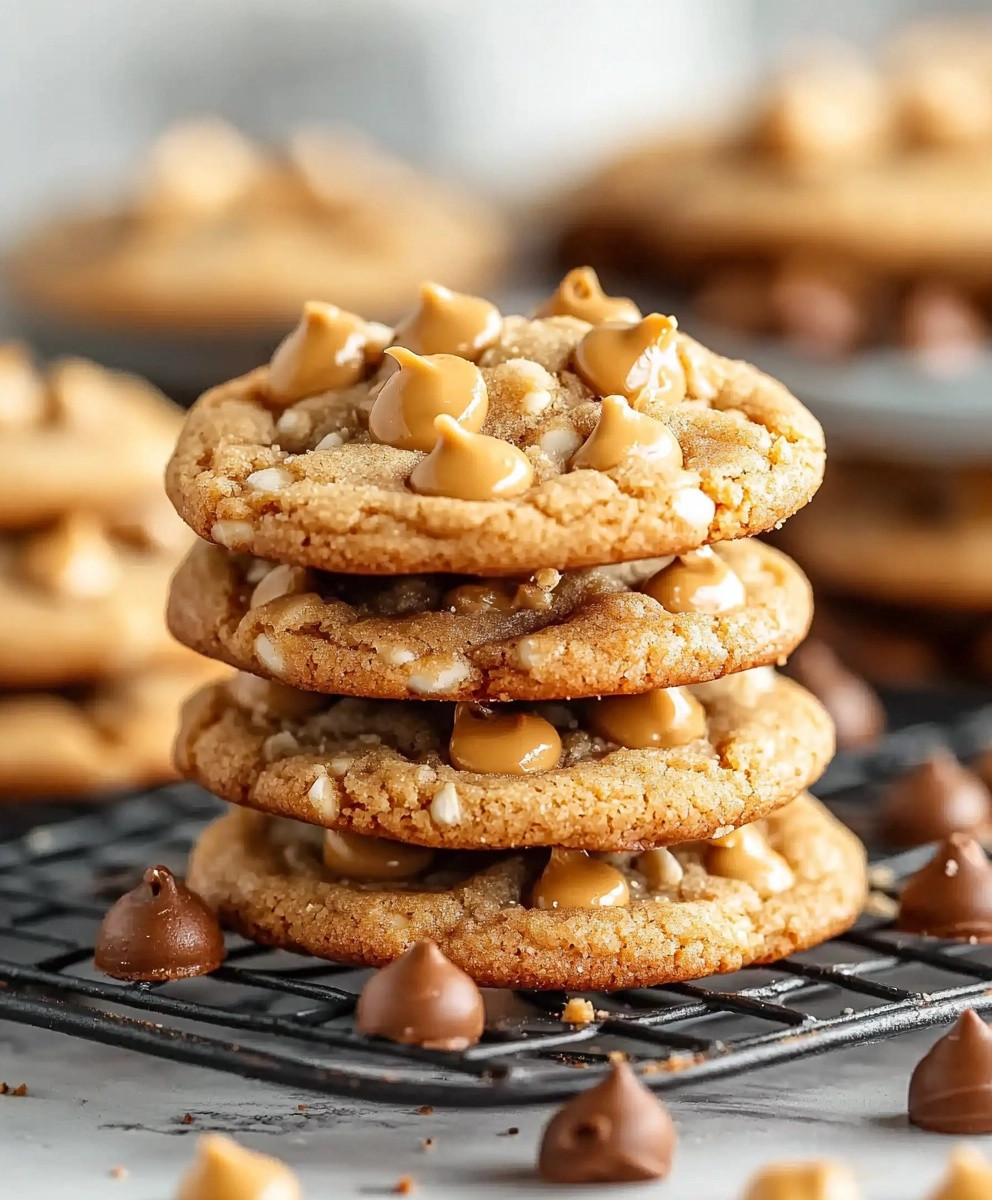
Butterscotch Christmas Cookies are a delightful treat that brings warmth and joy to any holiday gathering. As the festive season approaches, the aroma of freshly baked cookies fills the air, evoking cherished memories of family traditions and celebrations. These cookies, with their rich butterscotch flavor and chewy texture, have become a beloved staple in many households during Christmas time. The combination of sweet butterscotch chips and a hint of vanilla creates a mouthwatering experience that is hard to resist. People love these cookies not only for their delicious taste but also for their convenience; they come together quickly, making them perfect for last-minute holiday baking. Join me as we dive into the world of Butterscotch Christmas Cookies and discover how to create this scrumptious treat that will surely become a favorite in your festive repertoire!

Ingredients:
- 1 cup unsalted butter, softened
- 1 cup brown sugar, packed
- 1/2 cup granulated sugar
- 2 large eggs
- 1 teaspoon vanilla extract
- 2 1/2 cups all-purpose flour
- 1 teaspoon baking soda
- 1/2 teaspoon salt
- 1 cup butterscotch chips
- 1/2 cup chopped pecans or walnuts (optional)
- 1/2 teaspoon ground cinnamon (optional)
- 1/2 teaspoon ground nutmeg (optional)
Preparing the Dough
- In a large mixing bowl, I start by creaming together the softened butter, brown sugar, and granulated sugar. I use an electric mixer on medium speed for about 2-3 minutes until the mixture is light and fluffy. This step is crucial as it incorporates air into the dough, making the cookies tender.
- Next, I add in the eggs, one at a time, mixing well after each addition. Then, I pour in the vanilla extract and continue to mix until everything is well combined. The batter should be smooth and creamy at this point.
- In a separate bowl, I whisk together the all-purpose flour, baking soda, and salt. If Im feeling festive, I also add the ground cinnamon and nutmeg to the dry ingredients for an extra layer of flavor. This spice blend really enhances the holiday spirit in the cookies!
- Gradually, I add the dry ingredients to the wet mixture, mixing on low speed until just combined. I make sure not to overmix, as this can lead to tough cookies. The dough should be thick and slightly sticky.
- Finally, I fold in the butterscotch chips and chopped nuts (if using) with a spatula. This is where the magic happens! The butterscotch chips will melt slightly while baking, creating gooey pockets of sweetness in every bite.
Chilling the Dough
- Once the dough is ready, I cover the bowl with plastic wrap and place it in the refrigerator for at least 30 minutes. Chilling the dough helps the flavors meld together and prevents the cookies from spreading too much while baking.
Baking the Cookies
- Preheat the oven to 350°F (175°C). I like to do this while the dough is chilling so that the oven is hot and ready when Im done.
- After the dough has chilled, I line a baking sheet with parchment paper. This not only prevents sticking but also makes for easy cleanup!
- Using a cookie scoop or a tablespoon, I drop rounded balls of dough onto the prepared baking sheet, spacing them about 2 inches apart. I like to slightly flatten the tops of the dough balls with my fingers to ensure even baking.
- I pop the baking sheet into the preheated oven and bake for 10-12 minutes, or until the edges are lightly golden. The centers may look a bit underbaked, but they will continue to cook on the baking sheet after being removed from the oven.
- Once baked, I let the cookies cool on the baking sheet for about 5 minutes before transferring them to a wire rack to cool completely. This step is essential as it allows the cookies to set properly.
Assembling and Decorating (Optional)
- If I want to take my cookies to the next level, I sometimes drizzle a simple butterscotch glaze over the cooled cookies. To make the glaze, I melt 1/2 cup of butterscotch chips with 1 tablespoon of butter in a microwave-safe bowl, stirring until smooth.
- Using a fork or a piping bag, I drizzle the glaze over the cookies in a zigzag pattern. This adds a beautiful finish and an extra burst of butterscotch flavor!
- For a festive touch, I might sprinkle some holiday-themed sprinkles on top of the glaze before it sets. This makes the cookies not only delicious but also visually appealing for holiday gatherings.
Storing the Cookies
Conclusion:
In wrapping up this delightful journey into the world of Butterscotch Christmas Cookies, I cant help but emphasize why this recipe is an absolute must-try. The combination of rich butterscotch flavor, soft and chewy texture, and the festive spirit they bring to any gathering makes these cookies a standout treat during the holiday season. They are not just cookies; they are little bites of joy that can elevate your Christmas celebrations and create lasting memories with family and friends. For serving suggestions, I recommend pairing these cookies with a warm cup of spiced cider or a classic glass of milk. They also make for a wonderful addition to a holiday cookie platter, alongside other festive favorites like gingerbread or peppermint bark. If youre feeling adventurous, consider adding a sprinkle of sea salt on top for a sweet and salty twist, or mix in some chopped nuts for added crunch. The beauty of this recipe lies in its versatility, allowing you to customize it to suit your taste. I wholeheartedly encourage you to try making these Butterscotch Christmas Cookies this holiday season. I promise you wont be disappointed! Once youve baked a batch (or two), Id love to hear about your experience. Share your thoughts, any variations you tried, or even a photo of your cookie creations. Lets spread the joy of baking together and make this holiday season even sweeter! Happy baking! Print
Butterscotch Christmas Cookies: The Ultimate Festive Treat Recipe
- Total Time: 42 minutes
- Yield: 24 cookies 1x
Description
Enjoy these soft and chewy Butterscotch Cookies, packed with sweet butterscotch chips and optional nuts. Perfect for satisfying your cravings, they make a delightful treat for any occasion!
Ingredients
- 1 cup unsalted butter, softened
- 1 cup brown sugar, packed
- 1/2 cup granulated sugar
- 2 large eggs
- 1 teaspoon vanilla extract
- 2 1/2 cups all-purpose flour
- 1 teaspoon baking soda
- 1/2 teaspoon salt
- 1 cup butterscotch chips
- 1/2 cup chopped pecans or walnuts (optional)
- 1/2 teaspoon ground cinnamon (optional)
- 1/2 teaspoon ground nutmeg (optional)
Instructions
- In einer großen Schüssel die weiche Butter, den braunen Zucker und den weißen Zucker mit einem elektrischen Mixer bei mittlerer Geschwindigkeit 2-3 Minuten lang cremig schlagen, bis die Mischung leicht und luftig ist.
- Die Eier nacheinander hinzufügen und nach jeder Zugabe gut verrühren. Vanilleextrakt einfüllen und mixen, bis die Mischung glatt und cremig ist.
- In einer separaten Schüssel das Mehl, das Backpulver und das Salz vermengen. Nach Belieben Zimt und Muskatnuss für zusätzlichen Geschmack hinzufügen.
- Die trockenen Zutaten nach und nach zur feuchten Mischung hinzufügen und bei niedriger Geschwindigkeit mixen, bis alles gerade so vermischt ist. Übermixen vermeiden.
- Die Butterscotch-Stücke und die gehackten Nüsse (falls verwendet) mit einem Spatel unterheben.
- Die Schüssel mit Frischhaltefolie abdecken und mindestens 30 Minuten im Kühlschrank kühlen, um die Aromen zu vereinen und ein Ausbreiten beim Backen zu verhindern.
- Den Ofen auf 350°F (175°C) vorheizen.
- Ein Backblech mit Backpapier auslegen.
- Mit einem Kekslöffel oder Esslöffel runde Teigportionen auf das vorbereitete Backblech setzen, dabei etwa 2 Zoll Abstand lassen. Die Oberseiten leicht flach drücken für gleichmäßiges Backen.
- 10-12 Minuten backen, oder bis die Ränder leicht goldbraun sind. Die Mitte kann untergebacken aussehen, wird aber auf dem Backblech weiter garen.
- Die Kekse 5 Minuten auf dem Backblech abkühlen lassen, bevor sie auf ein Kuchengitter zum vollständigen Abkühlen übertragen werden.
- Für eine Butterscotch-Glasur 1/2 Tasse Butterscotch-Stücke mit 1 Esslöffel Butter in einer mikrowellengeeigneten Schüssel schmelzen und rühren, bis die Mischung glatt ist.
- Die Glasur in einem Zickzackmuster über die abgekühlten Kekse träufeln, entweder mit einer Gabel oder einem Spritzbeutel.
- Optional, vor dem Festwerden der Glasur, thematische Streusel darüber streuen.
- Die Kekse in einem luftdichten Behälter bei Raumtemperatur bis zu einer Woche aufbewahren oder für längere Lagerung einfrieren.
Notes
- For a richer flavor, consider using dark brown sugar instead of light brown sugar.
- Feel free to customize the nuts or spices based on your preference.
- Prep Time: 30 minutes
- Cook Time: 12 minutes
Leave a Comment